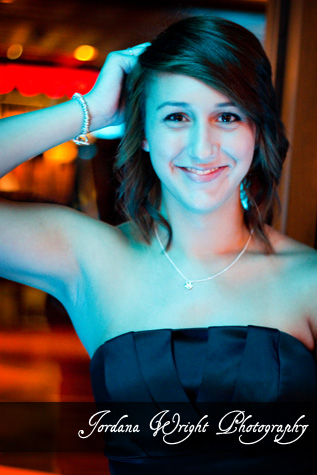
Yesterday we released a sneak preview of a recent Senior Portrait Session at the Palmer House Hilton in Chicago, IL. We've received a lot of positive feedback about the images, and decided to use the image below to respond to a few inquiries about our techniques, the lighting, and the post-processing used. This is also the first post of our Digital Classroom Project, which will provide aspiring photographers with the resources and information they need to succeed!
Understanding the Lighting
Part of a successful on-location shoot is finding incredible lighting opportunities while working within the specific constraints you are given. At the Palmer House Hilton, we were asked to shoot without a tripod, using only available light. This presented a challenge, as the Palmer House is stylishly but dimly lit, and we only had one hour to shoot. The specific location featured in this image provided both ample illumination and dynamic color to highlight the model in an interesting way.
Creating dynamic lighting is an interesting puzzle. It involves a careful balance of color, intensity, source location, and angle of the lights themselves -- all of which must be perfectly in sync with each other to bring out the best qualities of the location and the model. In this situation, the lighting was immovable, and the color, intensity, and angle were all set. In these situations, it becomes a matter of moving the model within the light sources until the desired effect is achieved. In a studio setting, one would be able to simply move the lights elsewhere, or perhaps decrease the intensity.
Steps in creating a lighting design:
- Determine the Key Light. The Key Light is the primary source of illumination for the photograph. In this example the Key Light is the teal light from the model's right. If you have one light to achieve your design objective, where would you put it, what color would it be, and from what angle? The Key Light should satisfy those requirements.
- Determine the Fill Light. The Fill Light serves to provide general illumination and balance to the photograph. It highlights features, cuts down on shadows, and can provide a different color source in an image. It helps to tone down the Key Light and makes it appear less harsh. In this image, we have two colors of Fill Light -- a teal light from the Model's left, but farther from the Model than the Key Light (thus reducing intensity), and a white, ambient light from above the Model, to her front and left.
- Determine other lighting sources. In this image, the third source of light is orange Back Light. Often Back Light is used directly on a Model or a backdrop, but in this case the backdrop itself emits light, and spills it directly onto the floor. The desired effect, which is to separate the Model from her surroundings, is achieved either way. In this image, the Back Light is far enough away from the Model to provide a gentle illumination from behind, without influencing the color or intensity of the other light sources.
- Determine the balance. This is the most important step of all, and is best learned through practice, trial, and error. Outside of the studio, the available lighting sources, venue restrictions, and desired effects will all greatly impact the balance of your lighting. Every situation will be different. That's what makes lighting and photography fun -- look forward to the challenge!

Understanding the Posing
With the given lighting restrictions explained above, we wanted to utilize the space in a dynamic way that would showcase the model's strengths. Our model has an honest, and engaging smile. To best feature that, and provide a level of accessibility to the image, we shot this image at the Model's eye level. The posing of her arm provides a line through the image that leads the viewer directly to the model's face. It also helps her interact with her surroundings while anchoring her in the space. Because the lighting is a more intense teal on her arm, leading to a brighter, more white light on her face, her face becomes the focus of the image. Unless your focus is something specifically different -- as with some product photography -- you always want the face to be the brightest part of the image. By framing the shot off center, the image also becomes far more compelling -- providing asymmetry of color with the orange Back Light only visible to the Model's right.
Understanding the Camera Settings
- RAW
- ISO - 1600
- White Balance - 6850*K
- Shutter speed - 1/40
- Aperture - f/1.8
- Manual Focus
If you are a professional or serious amateur, shoot RAW. The amount of flexibility it provides is due to the sensor capturing more of the available data and not compressing the file. Files are bigger, so you'll need more storage, but RAW will save shots that you'd otherwise throw away.
The ISO selected was the lowest possible ISO for the lighting conditions. By sticking to the lowest possible ISO, you can limit the amount of noise or grain as much as possible.
The White Balance of 6850 was achieved using the AWB setting. AWB can be a blessing and a curse. Sometimes, as seen with this image, the camera can determine a pleasing color that is very true to life. Other times, what you see is not what you get at all. Anytime you shoot with AWB, check your progress to make sure you're getting the colors the way you want them.
The Shutter Speed of 1/40 is the slowest Shutter Speed I can personally shoot with this particular lens without blur or noticeable camera shake. Every photographer should know what Shutter Speeds they can get away with when shooting without a tripod. In order for the image to be correctly exposed, and to not need an increase to my ISO, I shot this image at 1/40. If the lighting conditions, or the positioning of the model had changed, the Shutter Speed might also have changed.
Aperture is my favorite tool as a photographer. The ability to adjust Depth of Field, demonstrating to the viewer what is really important in an image, is powerful. With portraiture, I love to shoot with as large an Aperture as possible (remember large opening, small number). In this case, the 1.8 not only provided a nice blur to the background, but also allowed as much light as possible to reach the sensor. With the shallow Depth of Field that a 1.8 provides, it is important to be sure the subject is right in the middle of the area in focus. There's nothing worse than a model whose nose is the only thing in perfect focus.
With my 50mm lens, I always shoot with Manual Focus. If you trust your eyesight, it's the only way to go. You'll be able to keep up with little variations in positioning that may throw the auto-focus off. Manual focus is also quicker and quieter should the location of your shoot require you to be unobtrusive. Because I specifically shoot Manual Focus, I check my diopter (the dial that allows you to adjust the viewfinder to match your eyesight) routinely. This guarantees that your eye and lens are always in sync, greatly increasing the likelihood of capturing stunning, crisp images.
Understanding the Post-Processing
Our Post-Processing has two important phases -- RAW editing, and Photoshop editing. In the RAW editor, I make adjustments to the aspects of the image that you would have previously adjusted in a dark room -- like contrast, brightness, depth of the blacks, vibrance, etc. This is where you would tweak color temperature and exposure to match what you saw at the time of shooting. I tend to prefer high-contrast images in which colors are very vibrant. I traditionally make RAW edits to brighten images, add contrast, and make colors pop. It is important to learn the differences between the effects of the 'vibrance' and 'saturation' sliders. Take time to experiment. In the RAW editor, I also reduce noise as much as possible without losing detail in the image.
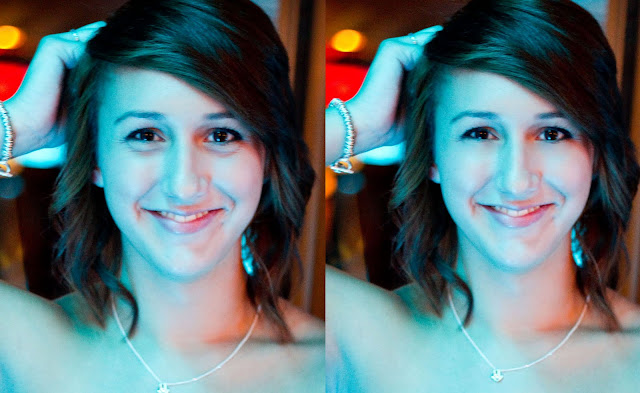
Once the image is open in Photoshop, I create a new layer for every aspect of editing. That way you can change opacity of specific adjustments, turn layers on and off to check for accuracy, and delete them if you're not happy with the effects. I remove blemishes with the Patch Tool, Lighten under-eye circles with a paintbrush on a transparent layer, and - if needed - brighten teeth and eyes. In portraiture for a non-commercial client, I never apply blur effects, or blur by hand any elements of the skin. I believe that models should look like the best version of themselves, while maintaining the nuances that make them real. I was asked by a fellow photographer from Google+ why I didn't remove the under-eye circles completely from this specific image. Below you can see my final edited image on the left, and the image re-edited to completely remove the under-eye circles on the right. The re-edited image feels artificial to me, particularly having met the model, who looks nothing like the girl on the right. Some lightening of under-eye circles is standard, to make models look less tired, but it is important to maintain the shape of the area under the eye -- it keeps eyes from feeling like they are floating on the face. Additionally, the facial expression in this image creates the shape and appearance of the eye -- images in which the model isn't smiling have less of a crease in the eye area. To remove that crease makes the expression feel unbalanced and fake; in this case, removing the facial feature that provides the cheek some of it's shape makes the face look unnaturally flat. The last thing you ever want as a photographer is to have your post-processing undermine the work you do at the shoot in posing, lighting, and composition. To complete most images, I add a vignette effect to draw further focus to the appropriate portion of the image.
Google+ for asking interesting and inspiring questions!
Please comment below with any additional questions or ideas you may have.
Check back soon for more "Understanding The Image" posts
from our Digital Classroom Project!